# Year End Filing
{% hint style="success" %}
### **Leveraging Agrigistics**
Agrigistics streamlines the bi-annual filing process by providing automated checks, data validation, and final submission tools. Our system helps ensure employee and company data are accurate, reducing the likelihood of errors.
{% endhint %}
## Year End Submission checklist
1. [Ensure that you are in September or later before you can start filing](#ensure-that-you-are-in-september-or-later-before-you-can-start-filing).
2. [Import Year to Date (YTD) figures - (if applicable)](#import-year-to-date-ytd-figures-if-applicable).
3. [Check for errors and download the IRP5 Validation report](#check-for-errors-and-download-the-irp5-validation-report).
4. Clear all validation errors
1. [How to clear employer detail errors](#steps-to-correct-the-company-details)
2. How to clear employee detail errors
1. [In Bulk using the EPI sheet](#how-to-correct-employee-details-errors-in-bulk)
2. [On the individual employee](#how-to-correct-employee-details-errors-per-individual-employee)
3. How to add employee tax reference numbers
1. [In Bulk using the EPI sheet](#how-to-correct-employee-tax-reference-numbers-in-bulk)
2. [On the individual employee](#how-to-correct-employee-tax-reference-numbers-per-individual-employee)
4. How to clear active period errors
1. [If the employee had a payslip **prior** to the start date of the active period.](#if-the-employee-had-a-payslip-prior-to-the-start-date-of-the-active-period)
2. [If the employee had a payslip linked to the employee **after** the termination date.](#if-the-employee-had-a-payslip-linked-to-the-employee-after-the-termination-date)
3. [If the employee had a payslip from Company A and a payslip from Company B during the same active period the error will trigger.](#if-the-employee-was-moved-from-company-a-to-company-b-but-the)
4. [If the employee had a payslip from Company A, but according to their active period they where employed in Company B.](#if-the-employee-had-a-payslip-from-company-a-but-according-to-their-active-period-they-where-employe)
5. [If you have more than one active period that overlaps with the same company for the same period.](#if-you-have-more-than-one-active-period-that-overlaps-with-the-same-company-for-the-same-period)
5. [Download the IRP5 Validation report again and ensure that all errors have been resolved](#download-the-irp5-validation-report-again-and-ensure-that-all-errors-have-been-resolved).
6. [Generate the EMP 501](#generate-the-emp-501).
7. [Generate the IRP5 electronic file](#generate-the-irp5-electronic-file).
8. [Import the file into e@syfile](#import-the-file-into-e-syfile).
## Ensure that you are in the new tax year (March or later)
You have to have finalised all your periods for the financial year has been finalised. Your February period needs to be finalised before you can start your year end process.
All your pay runs for the company needed to be finalised for February. Please see below guide that will show you how to finalise your pay run and to generate the documents for filing:
[How to finalise a pay run](https://help.agrigistics.co.za/modules/payroll/recurring-pay-runs/current-pay-run#finalise-a-pay-run)\
[How to generate documents for filing](https://help.agrigistics.co.za/modules/payroll/filing/monthly-filing#emp201)
## Import Year to Date (YTD) figures - (if applicable)
### Why would you potentially need to import YTD figures into the system?
If you migrated to our system during the financial year and you have processed periods for this financial year in a different payroll system you have the option to import the YTD's into our system so you don't have to import more than one IRP5 electronic file into e\@syfile.
This is not mandatory - but is available to all clients to adjust to their preference.
What you need to import your YTD figures into our system is an excel sheet with these 3 columns:
* Employee Code
* Tax Total
* Value linked to that tax total for the periods not processed in Agrigistics.
If you have imported YTD figures during the Bi-Annual period you don't have to re-import any figures. Those figures are in the system and will be on the IRP5's/IT3a's.
Please see below example of what your import sheet will need to look like:
### How to import the YTD figures?
1. Navigate to Payroll, Filing.
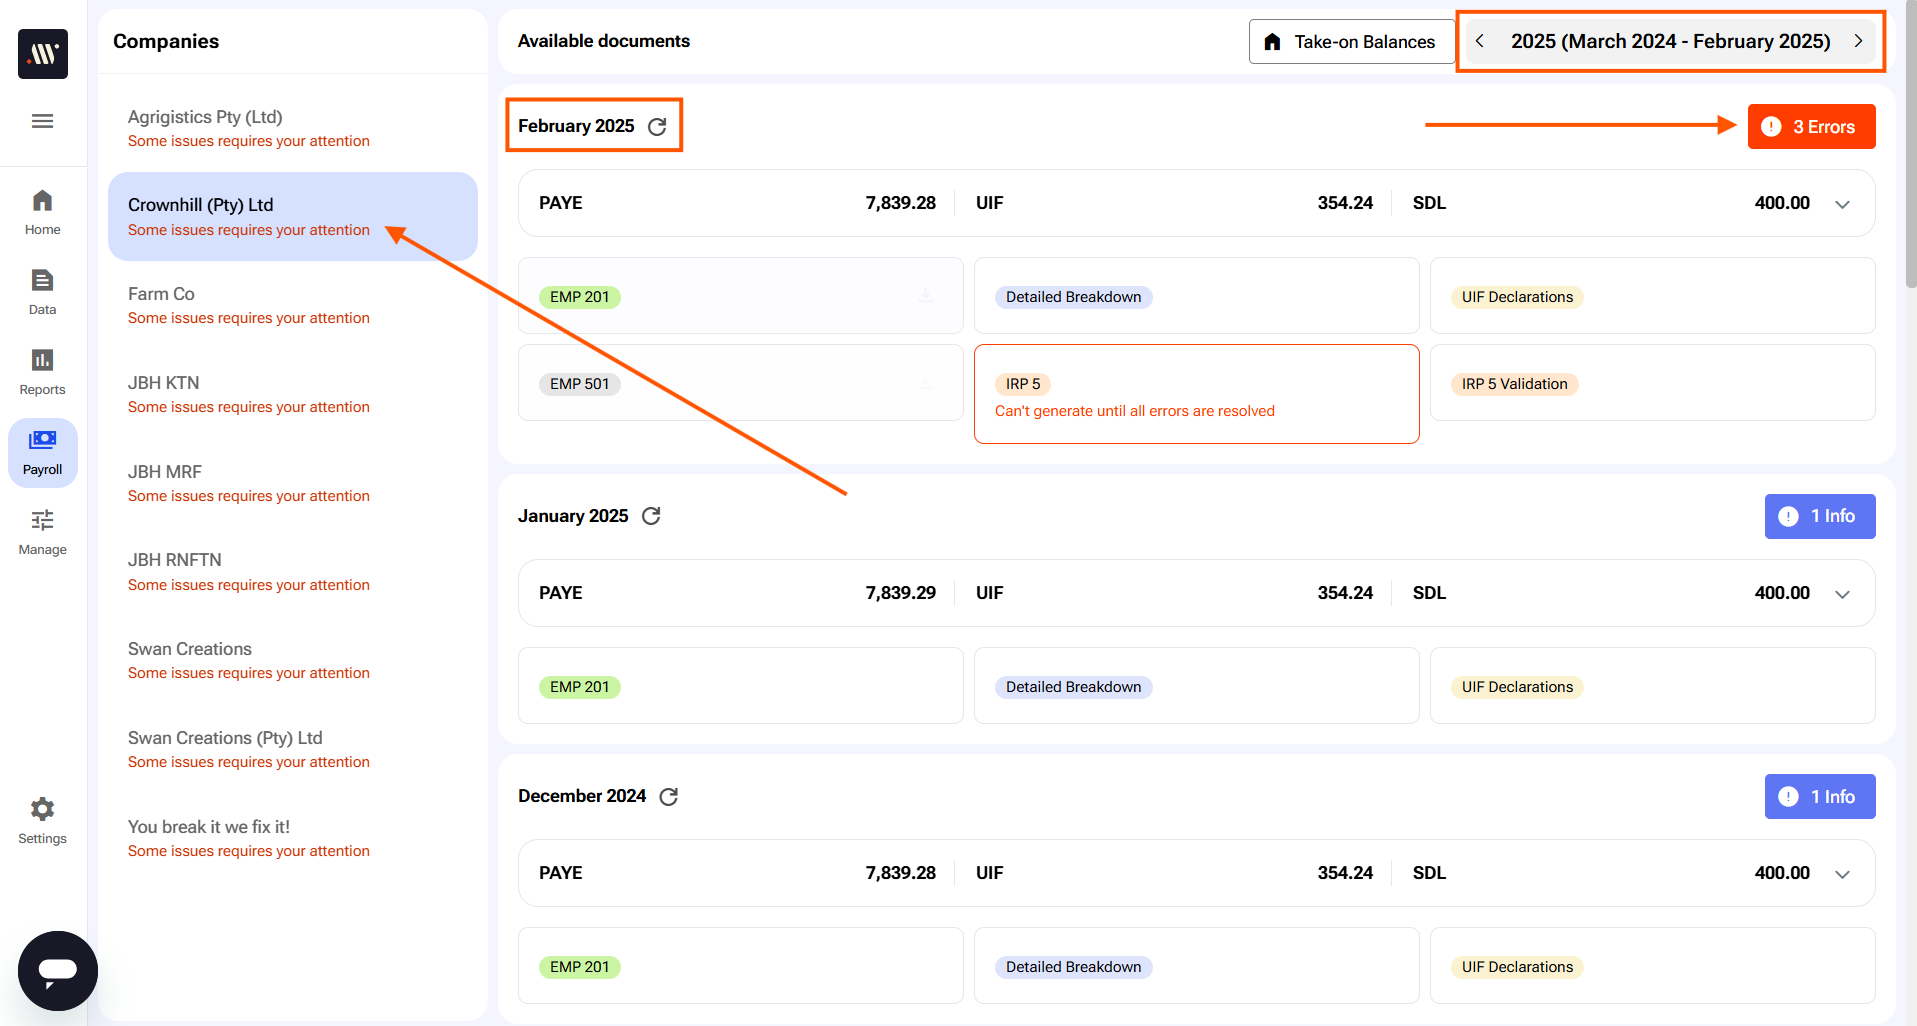
2. Make sure that you are in the correct year - for year end, make sure to revert back to the previous tax year by either clicking the back arrow on the date, or clicking on the date and selecting the previous financial year.
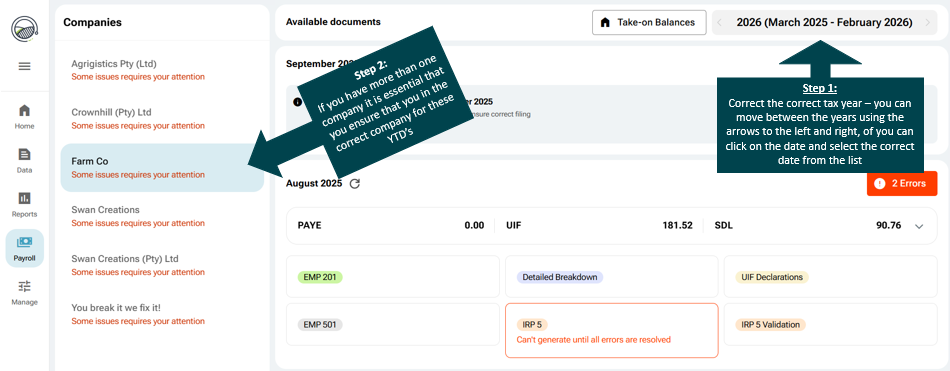
3. Make sure that you are in the correct company. It is **ESSENTIAL** that you select the correct company and year before continuing:
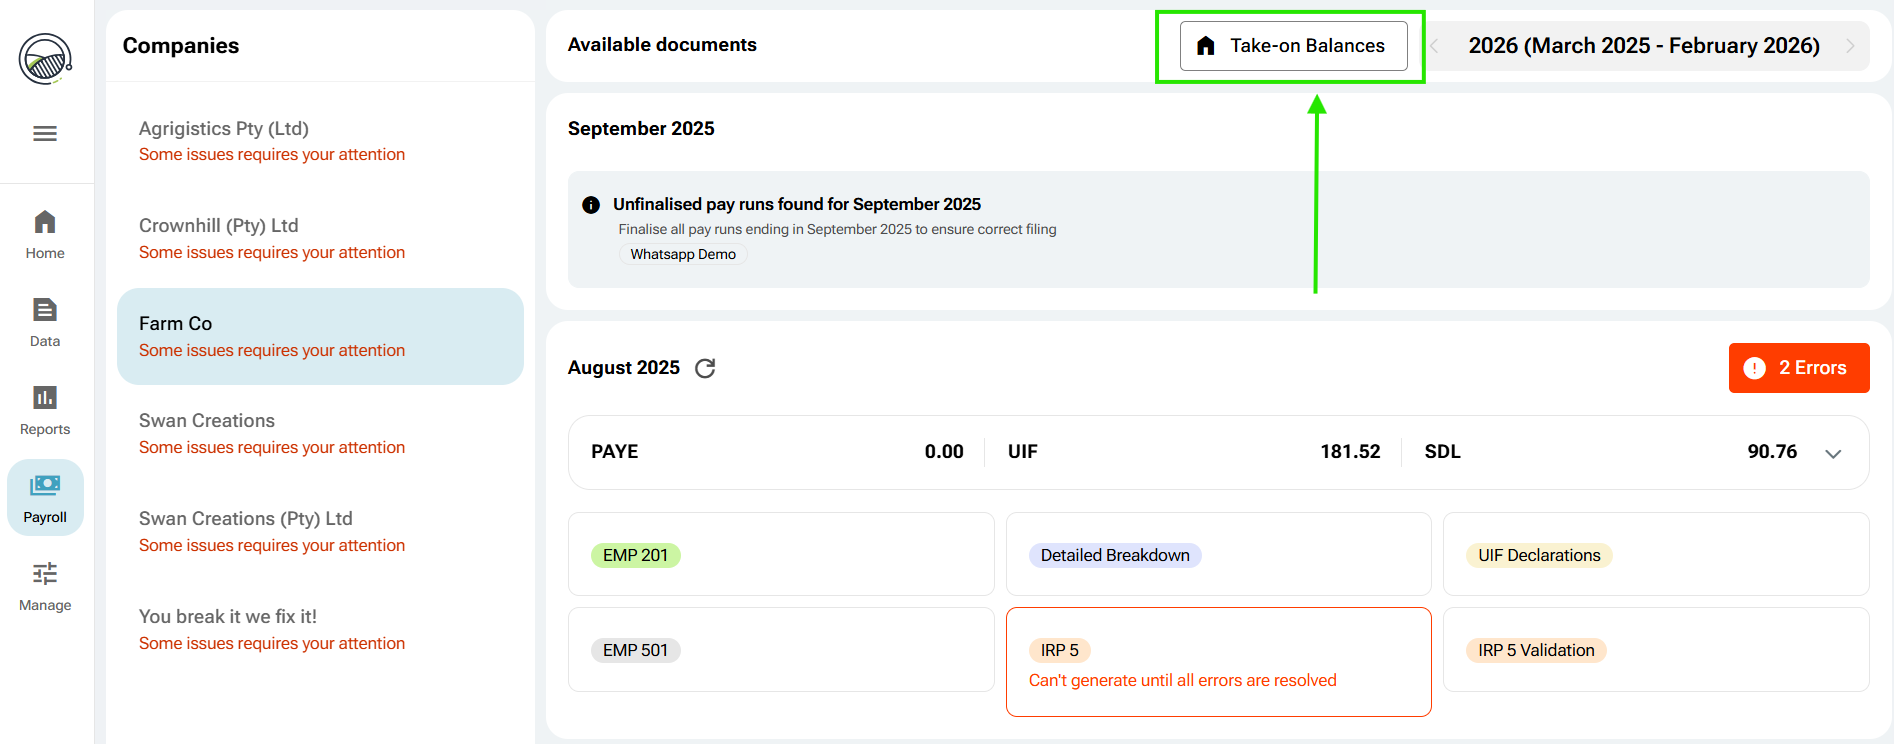
3. Click on Take-on Balances next to the date selection screen:
4. Locate the excel file that you have created with the import figures and click on OK.
5. Once the amounts have been processed, you won't get a message, however, the system will ask you to download the take-on-result file with the applicable year, this will show you if there where any errors and a summary of the information that has been imported.
## Check for errors and download the IRP5 Validation report
1. Navigate to Payroll, Filing.
2. Make sure that you select the correct company on the left hand side.
3. Revert back to the previous financial year, by either clicking the back arrow on the date, or clicking on the date and selecting the previous financial year. \
**NOTE:** If there are errors that will not allow you to generate the file you will see that the IRP5 will say 'Can't generate until all errors are resolved' and there will be a red Error button on the right hand side of the February period:
4. When clicking on the Errors - it will give you a summary of any errors or warnings for this bi-annual season.
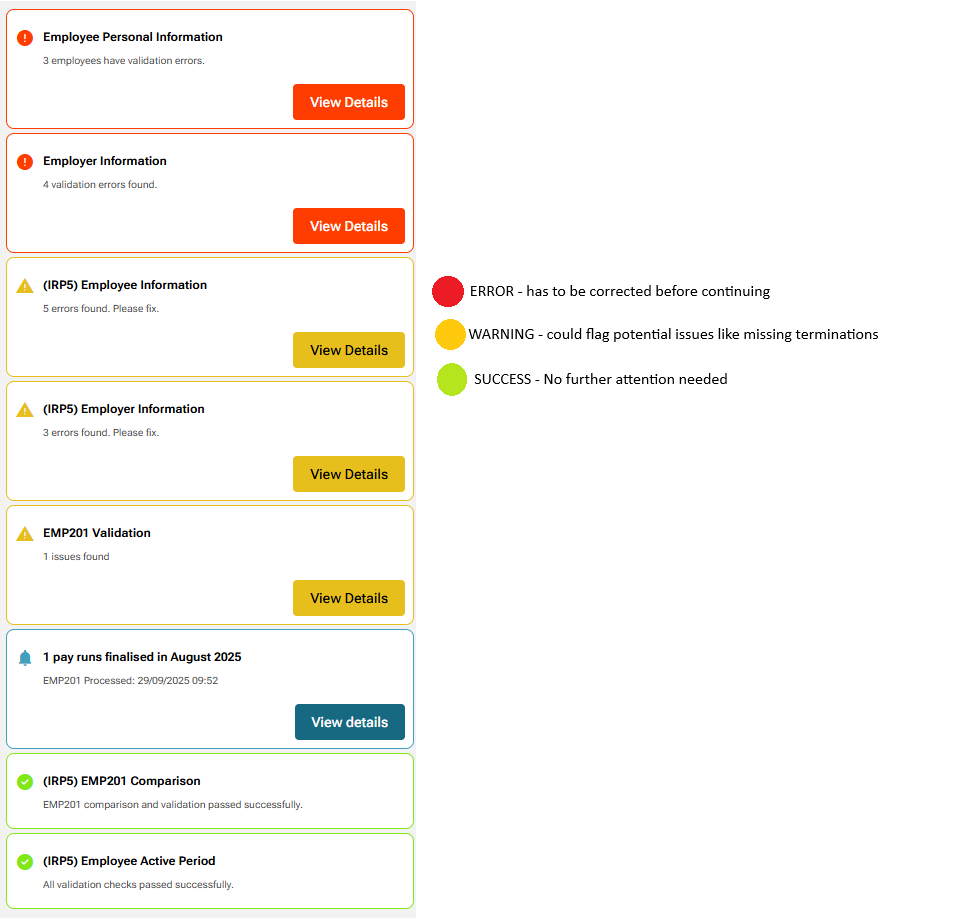
5. To see the full list of errors and warnings, you can click on IRP5 validation. This will download a zip file, double click on this file to open it. You will see the following reports in it:
1. Employee Pay Run List Report \
\&#xNAN;*This will show you all the pay runs that the employees have been in that will assist with correcting any active period issues.*
2. IRP5 Employee Personal Info \
\&#xNAN;*This is an EPI sheet that will have all the employees that are part of the errors - and you can use this sheet to make corrections and import the details back into they system.*
3. IRP5 Employee Totals\
\&#xNAN;*This will show you all the tax totals and the values for those tax totals that will be on the electronic file for each employee.*
4. IRP5 Validation Results\
\&#xNAN;*This report will show you the list of all the errors, warnings and successes linked to this company*
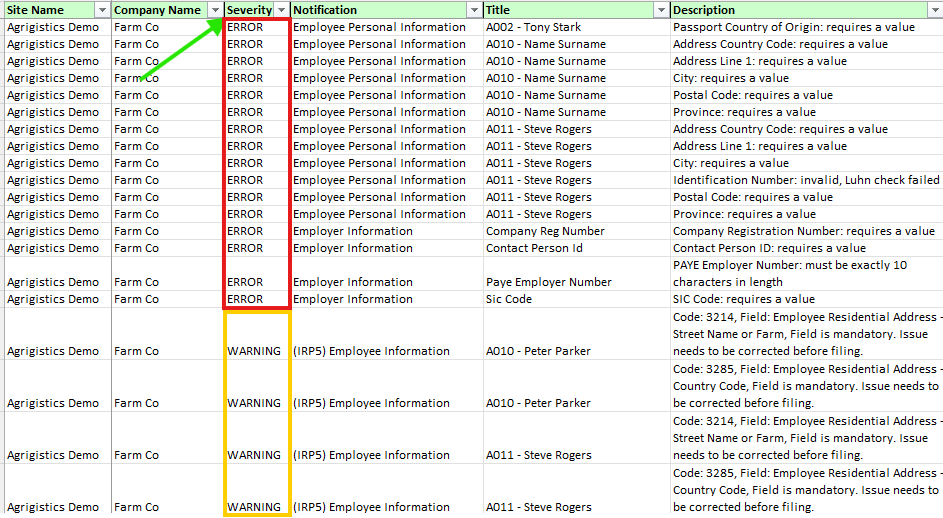
6. Open the IRP5 Validation Results excel sheet, all the items that shows as ERROR in the Severity column needs to be corrected. All the items that show as WARNING we advise that you check and ensure if the details are correct:
{% hint style="info" %}
If you have no errors, on the IRP5 Validation file, then you can continue to generate the EMP501 and the electronic file.
{% endhint %}
## How to correct employer details errors
{% hint style="info" %}
*Keep the IRP5 Validation Result sheet close by to check for any errors. This sheet is generated by navigating to:*\
*Payroll > Filing > Select the company on the left.* \
*For year end, make sure to revert back to the previous tax year by either clicking the back arrow on the date, or clicking on the date and selecting the previous financial year.*
{% endhint %}
#### Steps to correct the company details:
1. Navigate to Payroll, Companies.
2. Locate the company and click on the pencil on the right hand side.
3. Edit all the details that needs to be corrected and then click on save changes on the top right hand side.
## How to correct employee details errors in bulk
{% hint style="info" %}
*Keep the IRP5 Validation Result sheet close by to check for any errors. This sheet is generated by navigating to:*\
*Payroll > Filing > Select the company on the left.* \
*For year end, make sure to revert back to the previous tax year by either clicking the back arrow on the date, or clicking on the date and selecting the previous financial year.*
{% endhint %}
#### Steps to correct the employee details:
1. Navigate to the zip file that you have downloaded for the IRP5 Validation and open the **IRP5 Employee Personal Info** document.
2. Click on Enable Editing right on top.
3. Now correct all the details for the errors on the IRP5 validation on this document.
4. In Excel, click on File, Save As and select a directory where to save this document to - you can change the name of the file if needed.
5. Now in the system, you will need to import these details:
1. Navigate to Payroll, Employees.
2. Click on Export/Import on the top right hand side.
3. Click on Import.
4. Select Import Personal Information.
5. Click on Import.
6. Locate the Excel sheet and select it, then click on Open.
7. Click on Upload file.
8. Click on Next.
9. Click on Validate.
10. If there are any errors - please correct the errors first. If there are warnings, or no errors you can click on Imports with warnings or import.
## How to correct employee details errors per individual employee
{% hint style="info" %}
*Keep the IRP5 Validation Result sheet close by to check for any errors. This sheet is generated by navigating to:*\
*Payroll > Filing > Select the company on the left.* \
*For year end, make sure to revert back to the previous tax year by either clicking the back arrow on the date, or clicking on the date and selecting the previous financial year.*
{% endhint %}
#### Steps to follow to edit employee details per individual employee:
1. Navigate to Payroll, Employees.
2. Locate the employee in the list and click on their name and surname (not the check box).
{% hint style="info" %}
Remember, if you need to correct an employee that has already been terminated, you can just click on the green active period filter on the top of the screen and switch over to the inactive employees.
{% endhint %}
3. Edit the employee details.
4. Click on Save changes.
## How to correct Employee Tax Reference numbers per individual employee
{% hint style="info" %}
*Keep the IRP5 Validation Result sheet close by to check for any errors. This sheet is generated by navigating to:*\
*Payroll > Filing > Select the company on the left.* \
*For year end, make sure to revert back to the previous tax year by either clicking the back arrow on the date, or clicking on the date and selecting the previous financial year.*
{% endhint %}
{% hint style="warning" %}
NOTE:
You as an employer can register the employees in the following ways:
* [**e@syFile™ Employer** – Individual registration (ITREG) or bulk registration (BundleReg)](https://www.sars.gov.za/wp-content/uploads/Ops/Guides/PAYE-easyFileG01-e@syfile%E2%84%A2TC-Employer-Guide-External-Guide.pdf)
* **eFiling** – Up to 200 employees per batch
* [**TRN Enquiry Services** – Check or request Income Tax Numbers via eFiling](https://www.sars.gov.za/wp-content/uploads/Ops/Guides/GEN-ENR-01-G08-Tax-Reference-Number-TRN-Enquiry-Services-on-eFiling-External-Guide.pdf)
* **Manual registration** – At a SARS branch (appointment required)
We will not be able to help you with steps to register your employees - you will have to contact SARS if you are struggling with registering or retrieving the employees tax numbers.
{% endhint %}
#### Steps to follow to edit the tax reference number for individual employee:
1. Navigate to Payroll, Employees.
2. Locate the employee in the list and click on their name and surname (not the check box).
{% hint style="info" %}
Remember, if you need to correct an employee that has already been terminated, you can just click on the green active period filter on the top of the screen and switch over to the inactive employees.
{% endhint %}
3. Edit the employee details.
4. Click on Save changes.
## How to correct Employee Tax Reference numbers in Bulk
{% hint style="info" %}
*Keep the IRP5 Validation Result sheet close by to check for any errors. This sheet is generated by navigating to:*\
*Payroll > Filing > Select the company on the left.* \
*For year end, make sure to revert back to the previous tax year by either clicking the back arrow on the date, or clicking on the date and selecting the previous financial year.*
{% endhint %}
#### Steps to correct the employee tax reference number in bulk:
{% hint style="warning" %}
NOTE:
You as an employer can register the employees in the following ways:
* [**e@syFile™ Employer** – Individual registration (ITREG) or bulk registration (BundleReg)](https://www.sars.gov.za/wp-content/uploads/Ops/Guides/PAYE-easyFileG01-e@syfile%E2%84%A2TC-Employer-Guide-External-Guide.pdf)
* **eFiling** – Up to 200 employees per batch
* [**TRN Enquiry Services** – Check or request Income Tax Numbers via eFiling](https://www.sars.gov.za/wp-content/uploads/Ops/Guides/GEN-ENR-01-G08-Tax-Reference-Number-TRN-Enquiry-Services-on-eFiling-External-Guide.pdf)
* **Manual registration** – At a SARS branch (appointment required)
We will not be able to help you with steps to register your employees - you will have to contact SARS if you are struggling with registering or retrieving the employees tax numbers.
{% endhint %}
1. Navigate to the zip file that you have downloaded for the IRP5 Validation and open the **IRP5 Employee Personal Info** document.
2. Click on Enable Editing right on top.
3. Now correct all the details for the errors on the IRP5 validation on this document.
4. In Excel, click on File, Save As and select a directory where to save this document to - you can change the name of the file if needed.
5. Now in the system, you will need to import these details:
1. Navigate to Payroll, Employees.
2. Click on Export/Import on the top right hand side.
3. Click on Import.
4. Select Import Personal Information.
5. Click on Import.
6. Locate the Excel sheet and select it, then click on Open.
7. Click on Upload file.
8. Click on Next.
9. Click on Validate.
10. If there are any errors - please correct the errors first. If there are warnings, or no errors you can click on Imports with warnings or import.
## How to correct active period errors
{% hint style="info" %}
*Keep the IRP5 Validation Result sheet close by to check for any errors. This sheet is generated by navigating to:*\
*Payroll > Filing > Select the company on the left.* \
*For year end, make sure to revert back to the previous tax year by either clicking the back arrow on the date, or clicking on the date and selecting the previous financial year.*
{% endhint %}
When we use the term “Active period” we refer to the time an employee was physically employed in this financial year in a specific company. Before we give you the steps on how to correct the active period, I think it is important to explain why you are getting the active period error in the first place. The active period error usually triggers in these cases:
* If the employee had a payslip **prior** to the start date of the active period.
* If the employee had a payslip linked to the employee **after** the termination date.
* If the employee had a payslip from Company A and a payslip from Company B during the same active period the error will trigger.
* If the employee had a payslip from Company A, but according to their active period they where employed in Company B.
* If you have more than one active period that overlaps with the same company for the same period.
### **If the employee had a payslip prior to the start date of the active period.**
Example: The employees start date was 1 April. They however have a payslip with values for the pay run 23 March – 29 March.
#### How to fix the start date:
1. Navigate to **Payroll**, **Employees**.
2. Locate the employee from the list, if the employee is terminated, click on the orange Active filter and select Inactive and then locate the employee from the list.
3. Click on the employee name and surname to enter the profile.
4. Click on **Active periods** on the left hand side
5. Hover with your mouse on Active period that overlaps with the period mentioned in the error, then click on **Edit** that will appear on the right hand side.
6. You can now change the start date of that period to overlap with the start date that correspond to the date of the first payslip generated for the employee (In this case any date between 23 March and 29 March).
7. Click on **update**.
{% hint style="danger" %}
This can affect the EMP201 for that period and subsequently the EMP501.
{% endhint %}
### **If the employee had a payslip linked to the employee after the termination date.**
Example: The employees end date was 31 June. They however have a payslip with values for the pay run 1 August – 31 August.
#### How to fix the end date:
1. Navigate to **Payroll**, **Employees**.
2. Locate the employee from the list, if the employee is terminated, click on the orange Active filter and select Inactive and then locate the employee from the list.
3. Click on the employee name and surname to enter the profile.
4. Click on **Active periods** on the left hand side
5. Hover with your mouse on Active period that overlaps with the period mentioned in the error, then click on Edit that will appear on the right hand side.
6. You can now change the end date of that period to overlap with the end date that correspond to the date of the first payslip generated for the employee (In this case any date between 1 August and 31 August).
7. Click on **update**.
{% hint style="danger" %}
This can affect the EMP201 for that period and subsequently the EMP501.
{% endhint %}
### If the employee was moved from Company A, to Company B, but the employee was never terminated.
Example: This employee was employed in Company A from 1 March – 31 May. They moved to Company B on the 1st of June. However, this employee was never terminated in Company A and their active period was just changed to Company B from June going forward.
The only way to fix this is to correctly terminate the employee and re-enrol them on the new start date and this will take a whole lot of steps to complete:
* First generate a Cost Report for the employees in their current pay run.
* Remove the employee from the pay run.
* Terminate the employee on the last date that they where employed with the previous company.
* Re-enrol the employee.
* Add the employee back to the current pay run.
* Add the new active period for the new company.
* Add the original start date (if needed)
* You will need to use the Cost report generated in the first step to make sure that your payslip is the same as before removing the employees.
#### First generate a Cost Report for the employees in their current pay run
1. Navigate to Payroll, Pay runs.
2. Enter the appropriate pay run.
3. Click on Reports.
4. Click on Export next to Cost Report (New).
View guide [here](https://help.agrigistics.co.za/modules/payroll/recurring-pay-runs/current-pay-run#cost-report).
#### Remove the employee from the pay run
1. Navigate to **Payroll**, **Pay Runs**.
2. Go into the pay run the employee is in.
3. Use the **checkbox** next to the employees name and select the employee.
4. In the special selection menu click on the **trashcan** next to Generate Payslip.
5. Please refresh your chrome browser.
View our full guide to remove employees [here](https://help.agrigistics.co.za/modules/payroll/employee-information/move-employees-between-pay-runs-for-the-different-companies#remove-the-employee-from-the-current-pay-run).
#### Terminate the employee on the last date that they where employed with the previous company
1. Navigate to **Payroll**, **Employees**.
2. Use the **checkbox** and select the employee(s).
3. Click on **Resign** on the top of the screen.
4. Enter the **Termination date** as the last date of the previous finalised pay run.
5. Select the UIF status as **Transferred to another branch**.
6. Enter a internal Termination reason if you wish - this will appear on your termination report.
7. Make sure that **Pay Out Leave** has been **switched off**.
8. Click on **Resign**.
#### Re-enrol the employee
1. On the same Payroll, Employees screen, click on the green Active tag.
2. Select Inactive.
3. Use the checkbox to select the employee that we want to re-employee.
4. Click on Enrol.
View our full guide to enrol an employee [here](https://help.agrigistics.co.za/modules/payroll/employee-information/move-employees-between-pay-runs-for-the-different-companies#step-3-re-enroll-the-employee).
#### Add the employee back to the current pay run
1. Navigate to Payroll, Pay Runs.
2. Select the new pay run that this employee should go into.
3. Click on Add employee.
4. Click on the + next to No Employee linked.
5. Search and select the relevant employee.
6. You can use the pencil to edit the templates for this employee and make sure to add the template that is applicable to this employee.
7. Click on Add.
View our full guide to add employees [here](https://help.agrigistics.co.za/modules/payroll/employee-information/move-employees-between-pay-runs-for-the-different-companies#add-the-employee-to-the-new-pay-run).
#### Add the new active period for the new company
1. Once the employee has been added to the pay run you can enter their profile by clicking on their name (not the checkbox).
2. Click on Active period on the left hand side.
3. Click on Add Active period on the top right hand side.
4. Enter the start date and the correct company from the drop down.
5. Click on Add.
View our full guide to add an active period to an employee [here](https://help.agrigistics.co.za/modules/payroll/employee-information#adding-an-active-period-to-individual-employees).
#### Add the original start date (if needed)
1. While in the[ Active period section](https://help.agrigistics.co.za/modules/payroll/employee-information/move-employees-between-pay-runs-for-the-different-companies#step-5-add-the-new-active-period-for-the-employee) of the employee detail screen, hover with your mouse over the current active period you have just created.
2. Click on Edit on the right-hand side.
3. In the Set original start date section, enter the original date that the employee started with this company group.
4. Click on **Update**.
#### You will need to use the Cost report generated in the first step to make sure that your payslip is the same as before removing the employees
When moving employees between pay runs - only the rates move along with them. You will now need to add back any templates that has been removed during the moving between pay runs.
{% hint style="danger" %}
This can affect the EMP201 for that period and subsequently the EMP501.
{% endhint %}
### If the employee had a payslip from Company A, but according to their active period they where employed in Company B
Example: If the employee received their payslips from Company A, but their active period states that they are employed in Company B. This only applies if the company was incorrectly selected on the active period - not if the employee was moved between companies.
#### How to edit the company assigned to an Active period:
1. Navigate to **Payroll**, **Employees**.
2. Locate the employee from the list, if the employee is terminated, click on the orange Active filter and select Inactive and then locate the employee from the list.
3. Click on the employee name and surname to enter the profile.
4. Click on **Active periods** on the left hand side.
5. Hover with your mouse on Active period that is linked to the incorrect company, then click on **Edit** that will appear on the right hand side.
6. You can now click on the Company drop down and select the correct active period that the employee was linked to for the dates linked to this active period.
7. Click on **update**.
{% hint style="danger" %}
This can affect the EMP201 for that period and subsequently the EMP501.
{% endhint %}
### If you have more than one active period that overlaps with the same company for the same period
Example: This employee is monthly. And the current pay run month mentioned in your error is April and runs from 1 April to 30 April. This employee was terminated on the 1st of April, and then came back on the 5th of April. The system won't allow this as it can't allocate two active periods for the same company for the same period.
#### How to change this:
You will need to change the termination date for the previous active period to fall in the previous pay run period. And change the start date of the following active period to be the day after the termination date for the previous active period.
1. Navigate to **Payroll**, **Employees**.
2. Locate the employee from the list, if the employee is terminated, click on the orange Active filter and select Inactive and then locate the employee from the list.
3. Click on the employee name and surname to enter the profile.
4. Click on **Active periods** on the left hand side
5. Hover with your mouse on Active period that (in our example ends on the 1st of April).
6. Change the end date to the the end date op the previous pay run (in this case 31 March)
7. Click on update.
8. Now hover with your mouse on Active period that is mentioned in your error (in our example starts on the 5th of April).
9. Change the start date to the the start date op the that pay run (in this case 1 April)
10. Click on update.
{% hint style="danger" %}
This can affect the EMP201 for that period and subsequently the EMP501.
{% endhint %}
## Download the IRP5 Validation report again and ensure that all errors have been resolved.
1. Navigate back to Payroll, Filing.
2. Select the correct company on the left hand side.
3. Locate the August period and click on IRP5 Validation.
4. It will download a IRP Validation zip file.
5. Open the zip file and locate the IRP5 Validation report - make sure that there are no errors on the file. You can continue if there are warnings, but all errors needs to be corrected.
## Generate the EMP 501
{% hint style="info" %}
Please make sure that all your errors have been resolved before you generate the EMP 501
{% endhint %}
1. Navigate back to Payroll, Filing.
2. Select the correct company on the left hand side and ensure that you are in the correct year. *For year end, make sure to revert back to the previous tax year by either clicking the back arrow on the date, or clicking on the date and selecting the previous financial year.*
3. Locate the February period and click on EMP 501
{% hint style="info" %}
*On the EMP501 - you will see the EMP 501 that matches the electronic file on the right hand side and the list of the generated EMP201's on the left. There could be a change from the EMP201 due to pay runs being added for that month after the EMP201 has already been generated.*
{% endhint %}
## Generate the IRP5 electronic file
{% hint style="info" %}
Please ensure that all your errors have been resolved before downloading this file.
{% endhint %}
Once all the errors have been resolved (the red error button on the left hand side has changed to a blue button) you will be able to generate the IRP5 file.
1. Navigate back to Payroll, Filing.
2. Select the correct company on the left hand side and ensure that you are in the correct year. *For year end, make sure to revert back to the previous tax year by either clicking the back arrow on the date, or clicking on the date and selecting the previous financial year.*
3. Locate the February period and click on IRP5
{% hint style="warning" %}
NOTE: This file will download a CSV file and the icon will look almost like a Excel file. \
This is the correct format for e\@syfile.\
Do **NOT** open this file.\
Do **NOT** change the file type for this file.
Our file is based on the SARS Business Requirement Specification (BRS) document. There is only one version of this document active at any time and the requirements for import into e\@syfile will be the same as importing into e-filing. We can only test the import into the e\@syfile system, and due to this if the file imports into e\@syfile and not into e-filing you will need to contact SARS.
{% endhint %}
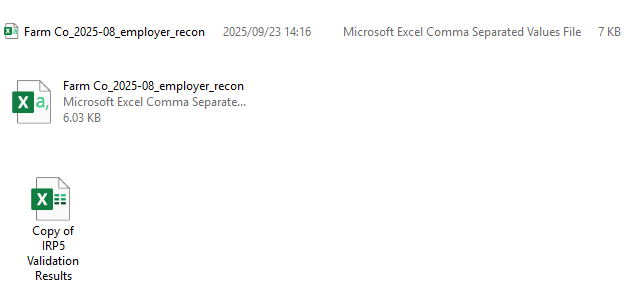
The name of the file will be the company name, underscore, submission date, underscore, employer\_recon:\
Company Name\_20xx-02\_employer\_recon\
\
Below is screenshot of what the icon for the file will look like in different view types:
## Import the file into e\@syfile
{% hint style="info" %}
Our file is based on the SARS Business Requirement Specification (BRS) document. There is only one version of this document active at any time and the requirements for import into e\@syfile will be the same as importing into e-filing. We can only test the import into the e\@syfile system, and due to this if the file imports into e\@syfile and not into e-filing you will need to contact SARS.
{% endhint %}
1. Open up your e\@syfile system.
2. Login using your e\@syfile credentials.
3. Select your employer from the list and click on Continue.
4. Click on Import Payroll file
5. Click on Select File and locate the electronic file and click on Open.
6. Click on OK
7. The e\@syfile system will now return the validation results, it will be one of the below options:
1. Payroll File passed Validation
2. Payroll File passed Validation with Warnings
3. Payroll File failed Validation.
8. After your file passed validation with or without warnings we can no longer assist you with e\@syfile any further. If your file fails validation, please reach out to us for further assistance.
{% hint style="info" %}
You can view a SARS video on completing your EMP501 [here](https://www.youtube.com/watch?v=piKzXzEjHKA) and view the e\@syfile employer guide [here](https://www.sars.gov.za/wp-content/uploads/Ops/Guides/PAYE-easyFileG01-e@syfile%E2%84%A2TC-Employer-Guide-External-Guide.pdf).
{% endhint %}